 I decided I needed an easier way of playing music on my old stereo in the workshop so it was time to see what could be done. I’m already quite a fan of Apple’s AirPlay protocol as it is very easy to use, however I wasn’t so keen on its proprietary nature. Fortunately this side of things has been solved and popular FOSS AirPlay server has been developed for Linux called ShairPlay.
The second part of the puzzle was to find some suitable hardware. I wanted something small and low power, preferably without moving part or dongles hanging of ports. Many folks use the Rasberry Pi and while I have some lying about, the fact it uses PWM for the analogue audio output is a serious let down for music playback.
Diving deeper into the junk box I dug up an old HP t5525 thin terminal. This is really just a standard x86 PC crammed into a little box and designed for low power operation. It’s very well built and has no fans or other moving bits, and best of all it features far better audio performance than the Rasberry Pi. Here’s the basic specs:
- VIA Eden 800MHz CPU
- 128MB DDR RAM
- 256MB IDE flash
- VIA Rhine II Fast Ethernet
- VIA AC’97 audio codec
- 4x USB 2.0 ports
- 1x serial, 1x parallel port
These thin terminals and later variants with AMD Sempron and Intel Atom CPUs can often be found dirt cheap on the second hand market (often for less than an RPi) and feature very low power consumption.
As far as software goes, OpenWRT supports x86 platforms and is designed for embedded platforms so it fits nicely with the limited amount of memory and storage on the thin terminal.
Image Download
If you just want to turn your VIA-based HP thin terminal into an AirPlay server with little fuss, just grab the image below.
This includes SSH, NTP, ShairPlay, ALSA, Avahi and kernel modules for the VIA Padlock crypto engine, VIA Rhine network and VIA AC’97 codec. Basic IPv6 support is included as ShairPlay seems to get upset without it. There’s also USB keyboard support which is handy if you don’t have a null modem cable lying about.
It’s very lean and I haven’t bothered to include much more than the bare necessities to administer the box and get AirPlay working. There is no web interface, wireless support or even drivers for any other brands of network interface. The root partition is 120MB so the while thing also fits onto the 128MB flash module fitted to the t5520 (Windows CE version of the t5525).
If you want additional functionality I suggest reading below to build an image with other utilities and packages.
OpenWRT Build Process
I’ve listed all the steps I took to build OpenWRT from scratch just in case it’s useful to anybody else.
This is easiest on a Linux distro. I suggest Linux Mint if you are new to that game and the instructions below are aimed at Ubuntu or Mint. If you use OS X then that should be fine; the OpenWRT wiki has a list of dependencies and you can install these easily via MacPorts or similar.
Install Dependencies
First install all the software we will require for obtaining and compiling the OpenWRT source:
sudo apt-get install build-essential gawk gcc-multilib git-core libncurses5-dev libxml-parser-perl subversion zlib1g-dev
Download the OpenWRT Source Tree
I used Attitude Adjustment so that’s what we will download here. Feel free to use a different version.
svn co svn://svn.openwrt.org/openwrt/branches/attitude_adjustment
Once this is complete you should find the entire source tree in the attitude_adjustment directory. The remaining commands assume you are working from this directory.
cd attitude_adjustment
Add ShairPlay Source
Mike Juni has forked an OpenWRT-specific version of ShairPlay. To include it, simply add the following line to feeds.conf.default:
src-git mikejuni git://github.com/mikejuni/OpenWRT-ShairPort;master
Now update the feeds:
scripts/feeds update -a
scripts/feeds install -a
Enable VIA AC’97 Kernel Modules
By default, OpenWRT doesn’t include modules for the VT8200 series AC’97 audio codec used in these old VIA HP thin terminals. That’s okay though as the modules we need are included in the mainline kernel, so it’s simply a matter of creating a suitable package definition to have OpenWRT include this.
Add the following lines to /kernel/modules/sound.mk. Note that the vt82xx modules depend on mpu401-uart.
define KernelPackage/sound-mpu401-uart
  TITLE:=MPU 401 UART support
  DEPENDS:=+kmod-sound-core
  KCONFIG:=CONFIG_SND_MPU401_UART
  FILES:=$(LINUX_DIR)/sound/drivers/mpu401/snd-mpu401-uart.ko
  AUTOLOAD:=$(call AutoLoad,36,snd-mpu401-uart)
  $(call AddDepends/sound)
endef

define KernelPackage/sound-mpu401-uart/description
  Routines for control of MPU-401 in UART mode
endef

$(eval $(call KernelPackage,sound-mpu401-uart))

define KernelPackage/sound-via82xx
  TITLE:=VIA VT82xx series AC97 Controller
  DEPENDS:=+kmod-ac97 +kmod-mpu401-uart
  KCONFIG:=CONFIG_SND_VIA82XX
  FILES:=$(LINUX_DIR)/sound/pci/snd-via82xx.ko
  AUTOLOAD:=$(call AutoLoad,37,snd-via82xx)
  $(call AddDepends/sound)
endef

define KernelPackage/sound-via82xx/description
 Support for the integrated AC97 sound device on motherboards
 with VIA chipsets.
endef

$(eval $(call KernelPackage,sound-via82xx))
Those trying to get sound support on older VIA C3 ITX boards may also find this useful.
Package Configuration
Now it’s time to configure the packages to be built in the OpenWRT image.
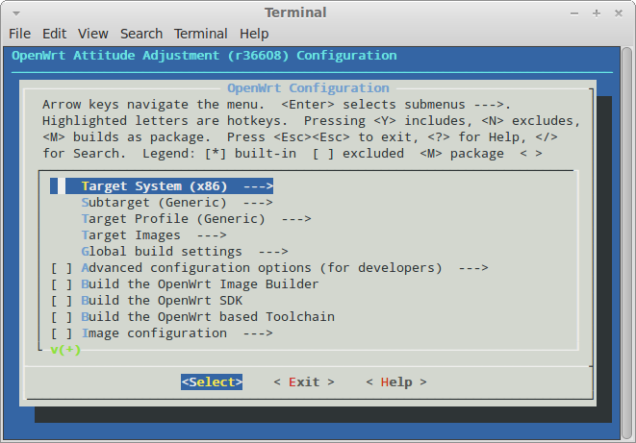
make menuconfig
This will start a menu driven interface similar to the one presented when selecting Linux kernel options.

Here’s the options I chose; feel free to change these to suit your system. I set all to * to include them in the base image rather than as a package.
- Target System: x86
- Subtarget: Generic
- Target Profile: Generic
- Target Images
- Root filesystem partition size: 120MB
- IPv6
- <*> 6scripts
- Kernel Modules
- Cryptographic API Modules
- kmod-crypto-aes
- kmod-crypto-hash
- kmod-crypto-hw-padlock
- Filesystems
- kmod-fs-ext4
- Libraries
- kmod-lib-zlib
- Network Devices
- kmod-via-rhine
- Sound Support
- kmod-sound-mpu401-uart
- kmod-sound-seq
- kmod-sound-soc-ac97
- kmod-sound-via82xx
- USB Support
- kmod-usb-hid
- kmod-usb-storage
- kmod-usb2
- Cryptographic API Modules
- Network
- IP Addresses and Names
- avahi-autoipd
- avahi-dnsconfd
- SSH
- openssh-client
- openssh-server
- Time Synchronization
- ntpd
- IP Addresses and Names
- Libraries
- Filesystem
- libext2fs
- SSL
- libopenssl
- alsalib
- libavahi-client
- libavahi-dbus-support
- Filesystem
- Utilities
- alsa-utils
- Sound
- shairport
Exit the configuration menu and save changes when prompted.
Now go make some coffee while we compile; depending on the options chosen and the speed of your machine this can take over an hour.
make
If you are an optimisation freak check the make options on the OpenWRT wiki.
One the build process is finished the OpenWRT images can be found in bin/x86.
Installing onto the Thin Terminal
The easiest way is to copy the resulting image to a USB flash drive and boot off that. This process completely overwrites any existing content on the drive!
Plug the USB drive in and then locate the device node it uses:
dmesg | tail
Decompress the OpenWRT image and copy the OpenWRT image to the USB drive shown above (in this case /dev/sdc). It’s easiest to do this in one command and shown below:
gunzip -c bin/x86/openwrt-foo.img.gz | sudo dd of=/dev/sdc bs=1M
Once that’s complete, rescan the partitions with partprobe or unplug and reinsert the drive. If we mount the partitions now we can make some configuration changes before booting so you don’t need a keyboard or display on the thin terminal.
If it doesn’t mount automatically you will need to do this manually (once again replace /dev/sdc with your USB drive device):
sudo mkdir -p /mnt/openwrt/boot /mnt/openwrt/root
sudo mount /dev/sdc1 /mnt/openwrt/boot
sudo mount /dev/sdc2 /mnt/openwrt/root
Configuration
Root Password
You will need to change the root password before you can login via SSH. If you have mounted the USB stick simply do this with chroot (replace the path to the OpenWRT root partition if necessary):
chroot /mnt/openwrt/
passwd root
Enter a new password then type exit to leave the chroot.
Network
Network settings are configured by editing /etc/config/network. Here’s an example:
# Copyright (C) 2006 OpenWrt.org

config interface loopback
    option ifname   lo
    option proto    static
    option ipaddr   127.0.0.1
    option netmask  255.0.0.0

config interface lan
    option ifnam    eth0
    option type     bridge
    option proto    static
    option ipaddr   192.168.1.5
    option netmask  255.255.255.0
    option gateway  192.168.1.1
    option dns      192.168.1.1
AirPlay
You will need to change the name of the mixer control to use for the AirPlay volume control or ShairPlay will crash.
Edit etc/config/airplay and set the volume line to PCM. You can also change the display name that ShairPoint anncounces itself as, for example ‘Workshop’ or ‘Games Room’.
config airplay
        option bname 'Workshop'
        option initbuf 320
        option daemonize true
#       option port 5002
#       option password '123456'
        option pcm 'default'
        option ctl 'default'
        option volume 'PCM'
Boot Config
Because we will be initially booting off a USB stick we will need to change the target device in the GRUB configuration. This is held in the first partition on the USB stick (e.g. /mnt/openwrt/boot).
As an alternative, if you have a keyboard and display attached to your target machine you can press e in the GRUB boot menu and edit the line manually during each boot. This will save you needing to edit it again once it is copied to the internal flash.
Edit boot/grub/menu.1st and change /dev/sda2 to /dev/sdb2 (you can use command below to do this for you).
sed -i -e 's/sda/sdb/' boot/grub/menu.1st
Don’t forget to unmount the USB stick before unplugging it!
Installing on the Target System
Insert the USB stick and boot up the target machine. It should be accessible via SSH after a few moments. If not, plug in a screen and check for any errors.
The last remaining steps are to configure ALSA to actually output sound and then install the image onto the built-in IDE flash.
ALSA Configuration
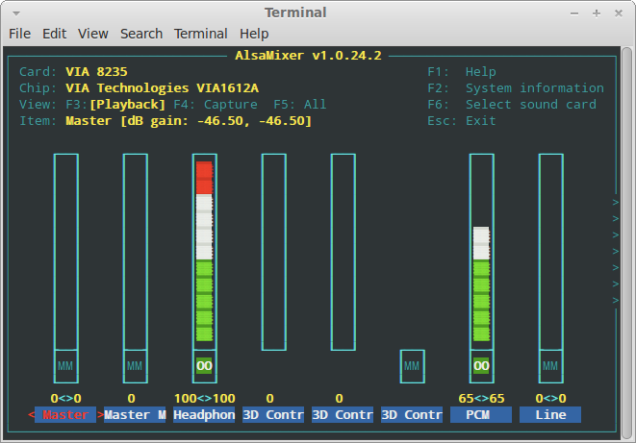
Run alsamixer to set the output volume. Set Headphones to 100% and press M to unmute it. Do the same for PCM but I recommend setting the level to about 60%.

ALSA will forget this when the system is shut down so we need to make it persistent. First save the configuration as it is now:
alsactl -f /etc/alsa0.state store 0
Then to restore this on boot, save the following into /etc/init.d/alsa-cfg. Setting the order to 98 ensures that ALSA is set up correctly before ShairPlay starts.
#!/bin/sh /etc/rc.common
START=98
start() {
    alsactl -f /etc/alsa0.state restore 0
}
Make it executable:
chmod +x /etc/init.d/alsa-cfg
Then enable it on boot:
/etc/init.d/alsa-cfg enable
Install on Internal Flash
From here simply block copy the USB stick onto the internal IDE flash:
dd if=/dev/sdb of=/dev/sda bs=1M
Once that’s complete, unplug the USB stick and reboot. Hopefully everything works as expected!
Bootnote
It’s getting late and I should really be doing homework so please accept my apologies if I’ve missed something!
I also found that image also works perfectly on the HP t5515 which is very similar but based on an 800MHz Transmeta Crusoe CPU. It draws even less power than the t5525 and appears to run happily off a 12v 1.5A power supply.
References
OpenWRT build documentation http://wiki.openwrt.org/doc/howto/build
ShairPort discussion https://forum.openwrt.org/viewtopic.php?id=29491
Hi Jeremy, if that’s you.
Would be great to touch base with you again, – and Clova Connect has some cash in the kitty to spend on some expert advice if you’re in the market.
Cheers,
Tony
your tutorial is realy great… but actually i’m not able to find all options to set up in the menuconfig with the Attitutde Adjustment r38462. may you can upload your version of the branch or edit your tutorial.
Thanks!
Hi, Wondering if you have given any more thought to openmesh project in Blenheim now ufb and adsl has improved here..
In the ALSA Configuration chapter: “chmod +s /etc/init.d/alsa-cfg” should be “chmod +x /etc/init.d/alsa-cfg”
Thanks for pointing that out, I’ve corrected it now.
Reupload please! 😦