I recently had a case to install Windows Server 2016 on a Dell PowerEdge R630 server. Microsoft make the ISO images available for download on their website, however the Windows Server 2016 ISO clocks in at over 6GB. Actually getting the server to boot and install from this ISO image was surprisingly difficult:
It’s too large for a regular DVD-R disc, and I didn’t have any dual-layer discs on hand.
The ISO image contains a file (install.wim) that is greater than 4GB, so won’t fit on a FAT32 filesystem as created by tools such as Unetbootin.
There is a command in Windows (dism) to split a WIM file but hadn’t come across any Linux tools to date. Update: wimlib can do this and means you can probably do this on a legacy FAT filesystem after all!
It’s too large to fit into Dell vFlash which has a image size limit of 4GB (presumably as it uses FAT32 internally).
Tools that were known to work such as Rufus and the Microsoft USB imager only run in Windows, which I didn’t have handy.
The ISO mounting capability via the server iDRAC console actually worked, but was painfully slow (hours).
So I set about to find a way to make a bootable Windows USB stick when you’ve only got immediate access to a Linux box. This took a few attempts to get right but turns out to be relatively simple. I imagine this will also be perfectly doable on a Mac as well, with a few modified commands.
Process
Here’s the actual process to create a bootable Windows installer on a USB stick from a Windows installer ISO image for a UEFI system. This should work for any Windows version released over the last decade or so. Secure Boot must be disabled for this to work.
WARNING: This will erase any existing data on the USB stick!
Plug the USB stick in and run dmesg to see what identifier it gets:
[28959.294103] usb 4-1: new SuperSpeed Gen 1 USB device number 15 using xhci_hcd
[28959.319266] usb 4-1: New USB device found, idVendor=0781, idProduct=5581, bcdDevice= 1.00
[28959.319278] usb 4-1: New USB device strings: Mfr=1, Product=2, SerialNumber=3
[28959.319282] usb 4-1: Product: Ultra
[28959.319286] usb 4-1: Manufacturer: SanDisk
[28959.319290] usb 4-1: SerialNumber: 1234567890
[28959.321513] usb-storage 4-1:1.0: USB Mass Storage device detected
[28959.322014] scsi host7: usb-storage 4-1:1.0
[28960.347536] scsi 7:0:0:0: Direct-Access     SanDisk  Ultra            1.00 PQ: 0 ANSI: 6
[28960.348477] scsi 7:0:0:0: Attached scsi generic sg2 type 0
[28960.349336] sd 7:0:0:0: [sdb] 60063744 512-byte logical blocks: (30.8 GB/28.6 GiB)
[28960.350654] sd 7:0:0:0: [sdb] Write Protect is off
[28960.350664] sd 7:0:0:0: [sdb] Mode Sense: 43 00 00 00
[28960.351430] sd 7:0:0:0: [sdb] Write cache: disabled, read cache: enabled, doesn't support DPO or FUA
[28960.399678]  sdb: sdb1 sdb2
[28960.402932] sd 7:0:0:0: [sdb] Attached SCSI removable disk
In this case the disk shows up as sdb, so the device we’ll use for this exercise is /dev/sdb. Yours may vary depending on how many disks you have connected to the system so you will need to modify the remaining commands accordingly.
The first step is to create a new GPT partition table:
sudo parted /dev/sdb mklabel gpt
Create an exFAT partition for the Windows ISO contents. We’ll set the partition type as NTFS; that is correct for exFAT. For the sake of simplicity I suggest using 0% and 99% as the boundaries as the exFAT driver filesystem image is only 512k. It’s a quick hack that saves calculating partition sizes and also helps ensure that parted correctly block aligns the partitions.
We’ll also need to enable the msftdata flag on the partition and then format it with an exFAT filesystem:
sudo parted /dev/sdb mkpart winsetup ntfs 0% 99%
sudo parted /dev/sdb set 1 msftdata on
sudo mkfs.exfat -n winsetup /dev/sdb1
Mount the Windows ISO and the exFAT USB stick partition. I suggest making some temporary working directory for these:
mkdir -p /tmp/{iso,usb}
sudo mount ~/Downloads/Windows_Server_2016_Datacenter_EVAL_en-us_14393_refresh.iso /tmp/iso -o loop,ro
sudo mount /dev/sdb1 /tmp/usb
cp -r /tmp/iso/* /tmp/usb/
Now create a partition for the exFAT/NTFS driver, and set the msftdata flag on this partition as well:
sudo parted /dev/sdb mkpart uefi-ntfs 99% 100%
sudo parted /dev/sdb set 2 msftdata on
We don’t need to format this one, we’ll just copy the Rufus driver image directly to it:
Sometimes when deploying stuff in the lab with self-signed certificates I find myself quickly rebuilding VMs after making breaking changes. Normally that’s not a problem, except when Firefox is being used to access the rebuilt VM occasionally we might see this error:
Secure Connection Failed
An error occurred during a connection to 192.168.24.201. You are attempting to import a cert with the same issuer/serial as an existing cert, but that is not the same cert.
Error code: SEC_ERROR_REUSED_ISSUER_AND_SERIAL
The page you are trying to view cannot be shown because the authenticity of the received data could not be verified.
Please contact the website owners to inform them of this problem.
I often see this occur with Foreman where the default configuration relies on the Puppet CA for certificate issuing.
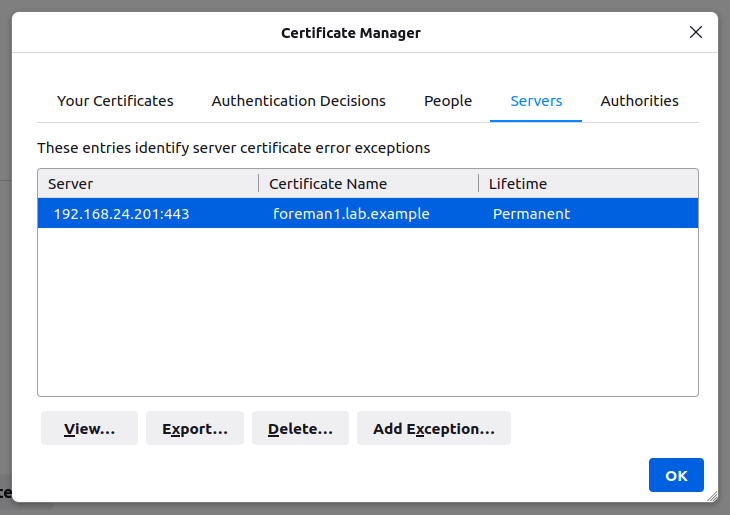
In theory you should be able to fix this by heading to Settings -> Privacy & Security -> View Certificates, selecting the Servers tab and then deleting the offending entry. In practice, however, this doesn’t often work.
Some forum posts suggest removing the entire certificate database. This works, but it’s a bit heavy handed as it clears out any other exceptions you may have saved in the past.
To fix this properly we need to use certutil as included with the Mozilla NSS tools. This command shouldn’t be confused with certutil.exe included with Windows, which is completely unrelated!
In install certutil on Ubuntu we need the libnss3-tools package:
sudo apt install libnss3-tools
In macOS, I recommend using Homebrew or MacPorts to install the nss package e.g:
brew install nss
Quit Firefox if it’s running. In theory it’s possible to do this in-place with SQL NSS databases but I’ve found it a bit hit and miss in practice.
First we need to figure out the Firefox profile directory. The configuration for this is usually in ~/.mozilla/firefox/profiles.ini(Linux) or ~/Library/Application Support/Firefox/profiles.ini (Mac).
Identify the Path to your profile directory, in this case
So in this case my profile directory would be ~/.mozilla/firefox/profiles/w6znk57b.default in Linux or ~/Library/Application Support/Firefox/Profiles/w6znk57b.default on Mac. Yours may vary slightly – just note that the Path entry is relative to the location of profiles.ini so you need to include any subdirectories in your commands. Note that the path is case sensitive.
From here we can use certutil to list the certificates (-L) in this store to find the offending entry. Modern versions of Firefox use the SQL NSS database, so we need to provide the location of the database in the form of sql:path.
A tip here – it might be useful to use grep to filter for the common name of the certificate used by the page throwing the error.
In this case the foreman1.lab.example entry is the offending one that we want to remove. To get rid of it we use the certutil delete command (-D) and specify the certificate nickname listed above after the -n argument. I recommend putting quotes around the nickname in case it includes spaces.
If certutil doesn’t return any messages then it’s likely to have worked. To verify we can simply run the list command again to check:
certutil -d sql:$HOME/.mozilla/firefox/profiles/w6znk57b.default -L
Certificate Nickname                                         Trust Attributes
                                                             SSL,S/MIME,JAR/XPI

DigiCert SHA2 Secure Server CA                               ,,
DigiCert TLS RSA SHA256 2020 CA1                             ,,
R3                                                           ,,
Amazon                                                       ,,
GTS CA 1O1                                                   ,,
At this point you should be able to reload the offending site and it should now work (although you will likely be prompted to accept the certificate again!).
If the above steps don’t work, try closing Firefox and repeating the delete command without the sql: prefix.
I’ve been using a VMware ESXi box as the foundation for a home lab for many years now, but without the benefit of the full (expensive!) vSphere/vCenter suite it’s a relatively tedious affair for managing anything beyond a tiny handful of virtual machines. I’ve recently begun using Vagrant for making bulk provisioning much faster, easier and more repeatable. It works well with VMware Fusion on the MacBook but I find the ESXi support a little lacking by comparison. It’s functional but has network configuration quirks and is very slow to provision VMs as it relies on copying the image to the ESXi host for every VM creation.
I recently had an attempt at interfacing Vagrant to libvirt/KVM/QEMU, the native virtualisation stack in Linux, and it’s a breath of fresh air! I’ve now replaced ESXi completely in favour of this setup.
Here’s a quick guide for anyone who is new to the process. While it would help to have basic familiarity with Vagrant, libvirt and Linux networking, I’ve tried to make this as easy as possible to get started.
I’m basing this example on Ubuntu 20.04 LTS. The same basic concepts apply to any Linux-based operating system, however you’ll need to adapt the instructions if you wish to use a different distro.
Networking Background
In the first instance I’ll attempt to explain some Linux networking basics to help provide some background for those relatively new to Linux virtualisation. VMware ESXi makes networking a fairly point-and-click affair; in Linux you’ll need to learn how to configure networking a bit more manually.
For the sake of keeping this article as simple as possible I won’t get into VLANs just yet; I’ll save that for a later post. In the example below I’ll be sharing the same network with the VMs and the host.
When using Linux virtualisation, the most common way to attach networks to virtual machines is to use bridges – these are essentially a software representation of a network switch (a switch is in fact a multi-port bridge!). This mimics the method that is most commonly done with VMware ESXi.
In the case of this post we’ll create a new bridge interface called br-mgmt. You can call it anything you like (within reason) but maintaining a naming convention helps to make interfaces easier to identify when you are managing the system. I often use the br- prefix followed by a short label for the function of the bridge. In this case I’ve used mgmt as this is will be the interface I use for accessing and managing the host.
Because I’ll be using this bridge on the same network as the one I’m accessing the host itself, we’ll need to ensure that:
The physical network interface of the host is attached to the bridge, and
The IP address used for accessing the host is attached to the bridge interface, not the physical interface.
We’ll cover this in the next section.
Network Setup
As I’m using Ubuntu 20.04 we’ll configure networking using Netplan. Although Netplan lacks a significant amount of advanced functionality, it’s relatively simple to set up and comes supplied out of the box. I don’t recommend you disable Netplan unless you are experienced enough to deal with networking via another means.
If you are using a different distro you will need to consult the distro documentation for instructions instead.
First find the interface name for the NIC in your machine using the ip address command; the exact name will depend on the hardware configuration of your machine:
ip address
1: lo: <LOOPBACK,UP,LOWER_UP> mtu 65536 qdisc noqueue state UNKNOWN group default qlen 1000
    link/loopback 00:00:00:00:00:00 brd 00:00:00:00:00:00
    inet 127.0.0.1/8 scope host lo
       valid_lft forever preferred_lft forever
    inet6 ::1/128 scope host
       valid_lft forever preferred_lft forever
2: eno1: <BROADCAST,MULTICAST,UP,LOWER_UP> mtu 1500 qdisc fq_codel master eno1 state UP group
    link/ether 54:52:00:d3:f5:eb brd ff:ff:ff:ff:ff:ff
    inet 192.168.10.7/24 brd 192.168.10.255 scope global dynamic noprefixroute eno1
       valid_lft 1227sec preferred_lft 1227sec
    inet6 fe80::1cf3:edff:fe8c:3ca3/64 scope link
       valid_lft forever preferred_lft forever
In this case the physical interface name is eno1 and it has the IP address 192.168.10.7. If the interface name on your own host is different then you will need to substitute it accordingly in the instructions below.
We’ll create a new Netplan configuration to:
Remove the IP address from the physical interface.
Disable DHCP on the physical interface so it doesn’t try to get an IP address automatically.
Create a new bridge called br-mgmt.
Attach the physical interface as a member of the br-mgmt bridge.
Assign an IP address via DHCP to the bridge.
Back up and remove any existing configuration from Netplan:
Log out and in to apply the group membership. At this point we should be all ready to go!
Vagrant Quick Start
Make a new directory for our project (e.g. lab1) and change into it:
mkdir lab1
cd lab1
We’ll also need the Vagrant libvirt plugin:
vagrant plugin install vagrant-libvirt
We need to create a Vagrantfile to define how our lab will look. In this case I’m going to create a lab with two VMs, both on the br-mgmt network with a fixed IP of our choosing. All will run Ubuntu 20.04 LTS.
Hostname
CPU Count
RAM (GB)
IP Address
vm1
2
3
192.168.10.201
vm2
1
1
192.168.10.202
vm3
1
2
192.168.10.203
Create a Vagrantfile to define some VMs using the template below. Note the custom network bridge to suit the bridge name we used in Netplan! The contents below should be saved as a file called Vagrantfile in the current working directory.
# Use libvirt as the default provider
ENV['VAGRANT_DEFAULT_PROVIDER'] = 'libvirt'

# Name of the bridge interface created in the steps above
bridge_iface = "br-mgmt"

# Define CPU count, memory (MB) and public IP addresses
# You can add any few or many lines as you like, assuming there is sufficient resource to run them!
nodes = {
  "vm1" => [2, 3072, '192.168.10.201'],
  "vm2" => [1, 1024, '192.168.10.202'],
  "vm3" => [1, 2048, '192.168.10.203'],
}

Vagrant.configure("2") do |config|
  # Use Ubuntu Focal image
  config.vm.box = "generic/ubuntu2004"


  # Apply config to each VM
  nodes.each do | (name, cfg) |
    numvcpus, memory, ipaddr = cfg

    config.vm.define name do |node|
      node.vm.hostname = name
      node.vm.network :public_network,
        :dev => bridge_iface,
        :mode => bridge",
        :type => "bridge",
        :ip => ipaddr

      node.vm.synced_folder('.', '/Vagrantfiles', type: 'rsync')

      node.vm.provider :libvirt do |v|
        v.memory = memory
        v.cpus = numvcpus
      end
    end
  end
end
Now to start the VMs run this command:
vagrant up
The first attempt might be a bit slow as the image will need to be downloaded and cached.
If you want to verify that the VMs are running you can use the virsh list command:
virsh list

 Id   Name               State
----------------------------------
 1    libvirt_vm1        running
 3    libvirt_vm2        running
 4    libvirt_vm3        running
To shut down VMs but retain their state:
vagrant halt
If you want to completely delete the VMs run the following command.
vagrant destroy
If you modify the configuration of any existing VMs in the Vagrantfile then you will need to destroy those VMs and rebuild then again using vagrant up.
To access a VM for administration, use vagrant ssh <hostname>, e.g:
vagrant ssh vm1
If you install any applications on the VMs then they should be accessible on the network via the IP addresses we set above.
Desktop App
If you are running this on a desktop machine then you can use the Virt Manager app to view and interact with the VMs. First ensure that it is installed:
sudo apt install virt-manager
From here you should be able to run the Virtual Machine Manager application from your desktop:
Conclusion
There we have it, a quick crash course in using Vagrant to drive libvirt! In coming posts I’ll describe a bit more about common tasks in libvirt and also using Vagrant and Ansible together to automatically configure the VMs after deployment, which is where the real power comes into this toolset!
I recently installed Ubuntu 20.04 “Focal Fossa” on an old desktop. My junk box has shrunk over the years so the only surplus graphics card I had on hand was an ancient Nvidia GeForce 210.
I didn’t think too much about the age of the card and at first all seemed well – the machine booted and the installation process started without any drama. Until near the end of the installation process where I received an error caused by the nvidia-340 package, and the machine didn’t boot properly after the installation finished. I tried again without the proprietary packages and installation completed and the machine rebooted to the login screen. When I tried to log in I got a blank screen and not much else – sadly I’ve seem a number of similar issues when using the free Noveau driver that is the default option for Nvidia cards in most Linux distros.
Eventually I discovered a few things that I’m making a note of here in case anyone else stumbles across this issue:
It appeared that the Ubuntu installer was smart enough to realise I needed the nvidia-340 driver package, but not smart enough to realise that this meant reverting to the original GA kernel version of 5.4 (this is the default in the server version). An unfortunate combination!
Here’s how to install the desktop anyway and still get the card running with the Nvidia driver. The downside to not using the HWE kernel is potential lack of support for really recent hardware models, but if you are using such an old GPU in the first place I’m guessing the rest of your machine isn’t particularly bleeding edge either.
Boot from the Ubuntu 20.04 Desktop DVD, ISO or USB image and run the installer.
When prompted for the installation type, disable the option to install third-party drivers and codecs:
Wait for the installation to finish and login to the desktop.
Open a terminal and install the GA kernel package: sudo apt install --install-recommends linux-generic
Reboot so we can load the older kernel version – don’t install the legacy Nvidia drivers until you are actually running the 5.4 kernel.
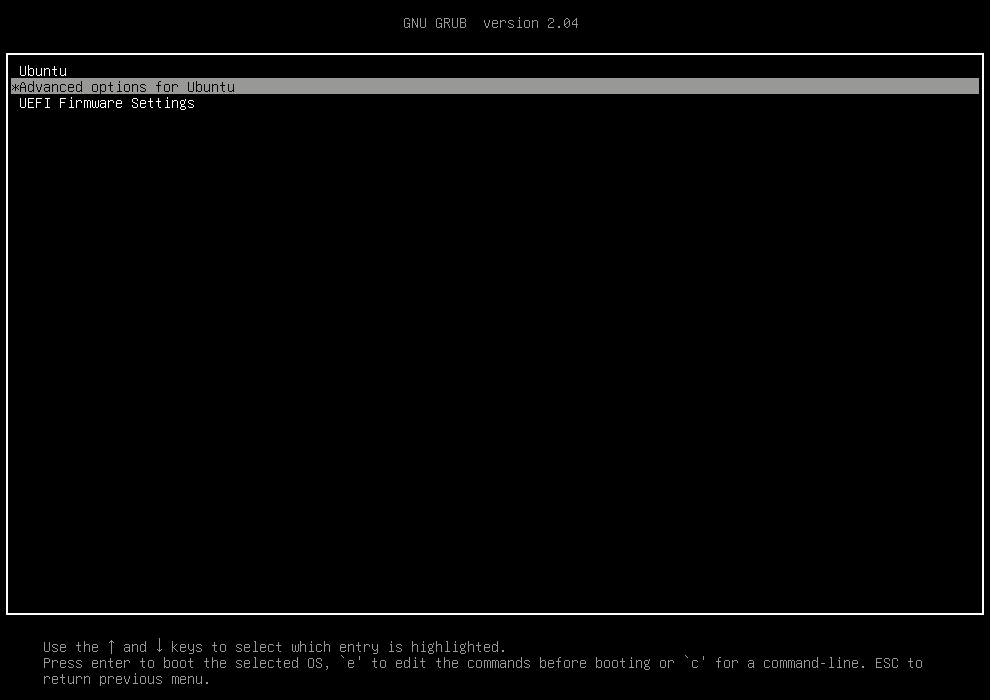
Press Esc immediately after the BIOS POST to enter the GRUB menu.
Select Advanced Options for Ubuntu and press Enter:
Select the latest 5.4 kernel version listed and press Enter to begin booting:
Log in and run a terminal again.
Check that the machine is actually running a 5.4 kernel version using the uname command: uname -r 5.4.0-81-generic
Install the Nvidia legacy driver: sudo apt install nvidia-340
If all goes well then you can remove the HWE kernel packages: sudo apt-get remove --purge linux-generic-hwe-20.04 linux-oem-20.04 linux-hwe-* linux-oem-* linux-modules-5.1*
Reboot and check that everything works!
So that’s not the most “direct” method, but it’s the least likely to get you into a frustrating position like accidentally removing all of the kernel packages entirely and rendering the machine unbootable.
If you want to verify the driver being used for the GPU, launch a terminal and run lspci to find the PCI address of the Nvidia GPU:
In this case we can see the GPU itself is at PCI address 03:00.0 although this may differ on your system. Run lspci in verbose mode (-v) and specify the address (-s 03:00.0) to find the kernel module (driver) in use:
lspci -vs 03:00.0
03:00.0 VGA compatible controller: NVIDIA Corporation GT218 [GeForce 210] (rev a2) (prog-if 00 [VGA controller])
	Subsystem: ASUSTeK Computer Inc. GT218 [GeForce 210]
	Flags: bus master, fast devsel, latency 0, IRQ 88
	Memory at f6000000 (32-bit, non-prefetchable) [size=16M]
	Memory at e0000000 (64-bit, prefetchable) [size=256M]
	Memory at f0000000 (64-bit, prefetchable) [size=32M]
	I/O ports at 8000 [size=128]
	Expansion ROM at 000c0000 [virtual] [disabled] [size=128K]
	Capabilities: <access denied>
	Kernel driver in use: nvidia
	Kernel modules: nvidiafb, nouveau, nvidia
In this case the driver in use is nvidia, which is the official Nvidia driver and should enable full hardware acceleration capabilities of the GPU.
If you do end up with a non-working system, press Esc at boot to get to the GRUB prompt and try booting into recovery mode. That should enable you to be able to remove the Nvidia driver package, reinstall the HWE kernel and revert any changes.